![]()
![]()
![]()
![]()
![]()
![]()
![]()
![]()
![]()
![]()
![]()
Chapter Eight
(In this chapter, you may not believe what you are reading!)
So far, this book has not even mentioned exposure readings or light meters or any form of measuring light. I imagine some readers have questioned that. This subject is really exciting, and I urge you to continue reading this chapter with undivided interest, for I propose you will read some material you have not read before. Let’s get started. Keep an open mind!
Frequently, automatic cameras cannot accurately measure light, so your photographs will not be properly exposed. Frequently, light meters within your manual camera or hand held light meters cannot accomplish this task either. There is a fascinating experiment you can and SHOULD perform to understand this. Here is what you do. Have a friend of yours wearing a medium dark gray shirt stand outside on a bright sunny day facing the sun. Set your light meter assuming you are using ISO 100 speed film, and take a light meter reading about 3 or 4 feet away measuring the average reflected sunlight from your friend. With ISO 100-speed film, your light meter should indicate a shutter speed of close to 1/250th and a lens opening of f/8. Now, keep the shutter speed of 1/250th of a second constant, and have your friend hold up a white sheet with arms fully extended completely covering the gray shirt. Have the sheet go no higher than up to your friend’s chin making sure your friend’s face is not covered. Take another light meter reading. It should be around 1/250th shutter speed and f/16 lens opening. Now, have your friend put the white sheet down and hold up a black sheet (cloth,
jacket, blanket – anything black) with arms fully extended also completely covering the gray shirt. Have the black cloth go no higher than up to your friend’s chin. Make sure your friend’s face is not covered. Take another light meter reading. It should indicate around 1/250th shutter speed and f/5.6 lens opening. Let’s see what just happened.
White cloth -- 1/250th -- f/16
Gray shirt -- 1/250th -- f/8
Black cloth -- 1/250th -- f/5.6
Remember from former chapters in this book that each f-stop doubles or cuts in half the amount of light it allows to pass through the open shutter to expose the film? Well, let’s look at the f-stop range of our little experiment. A f-stop of f/16 allows 1/8th the amount of light to pass through the lens opening as f/5.6 allows (f/5.6 to f/8 cuts in half the light; f/8 to f/11 cuts the light in half again {1/2 to 1/4th}. F/11 to f/16 cuts the light in half again {1/4th to 1/8th}).
Remember:
Going this way › on the f-stop scale, each subsequent f-stop cuts the amount of light in half (i.e. f/5.6 to f/8)
each f-stop cuts the light in half going this way›››
f 2 f2.8 f4 f/5.6 f/8 f/11 f/16
‹‹‹ each f-stop doubles the light going this way
The light meter told you to set your camera at various lens openings that varied the intensity of light reaching your film by 8 times, yet the amount of reflected sunlight
from your friend’s face remained constant and unchanged! How could you possibly get a correct exposure for your friend’s face?
Similar light meter reading discrepancies occur constantly with all light meters. A dark forest in the background, white clothes, a bright sky filled with white clouds, excessive shade, dark colored clothes, and millions of other items all throw off your light meter reading. In fact, it’s almost impossible to get a correct light meter reading either from an automatic camera, a light meter built into your camera, or a hand held light meter. I know you’re not convinced, but read on – shortly you will be!
Here’s a fascinating experiment you should do when you have the time. On a bright sunny day, load your camera with black and white film and go to a shopping center parking lot. Find a white car and a black car both parked with the sun shining directly on the car doors. Take a light meter reading one foot away from the white car’s door. The light meter reading might be something similar to ISO 100 speed film, f/16 lens opening, 1/250th of a second. What ever settings the light meter directs you to use, set your camera that way and then take a close up picture of only the white car’s door – only the door, no surrounding area. Now move to the black car. Take a light meter reading from one foot away from the black car’s door. The light meter reading might be something similar to ISO 100 speed film, f/5.6 lens opening, 1/250th of a second. What ever settings the light meter directs you to use, set your camera that way and then take a close up picture of only the black car’s door – only the door, no surrounding area. If you have the black and white film developed and printed, you will find that BOTH car doors are the same color -- medium gray. You will not have a photograph of one white door and one black door, but two gray doors. Why?
Established Light Meter Standards
Light meter and camera manufacturers had to come to an agreement regarding how light measurements were going to translate into the “average” photo scene with the “average” amount of reflected light. Obviously very bright subjects (white clothes, white beaches, bright sky and clouds) would reflect much more light than dark subjects (dark clothes, forests, mountains, shadows), and the average amount of light reflected from the average scene had to be determined as a standard. Once this standard was established, light meters and cameras could be coordinated so they all gave identical readings.
Well, it was estimated that the “average” scene (grass, trees, sky, clouds, buildings, and people) reflects 18% of the light. The white clouds will probably reflect 95% of the sunlight, the sky 85%, the grass 18%, the trees 8%, buildings around 12%. The combined weighted average is about 18%. Therefore, most light meters are designed to inform you how to set your camera to photographically duplicate something that reflects 18% of the sunlight. For your information, the color medium gray reflects about 18% of the light. That’s why the light meter gave instructions for the white car door to be turned darker to a medium gray. That’s why the light meter gave instructions for the black car door to be turned brighter to medium gray. This is critically important to understand for ANY kind of photography!
The next time you’re in a camera store, ask the most knowledgeable clerk for a “gray card.” This is nothing more than a piece of cardboard made by Kodak and colored the exact gray that reflects 18% of the light. If you take a light meter reading in the sunlight from this gray card instead of from your subjects, you will be given, probably for the first time ever, a correct camera setting to precisely duplicate that gray card in your photograph. If you duplicate the gray card, you will automatically duplicate most everything else in your photograph (bright sky and clouds, dark forests, people, etc.). This may be the best-kept secret in photography!
Is There an Easier Way To Set A Correct Exposure?
Do you want me to make it easier for you than suggesting you go buy a gray card? OK, I will. Green grass in the sunlight reflects 18% of the light. If you’re around grass when you take your photographs, you don’t need a gray card. Simply take a light meter reading from the green grass in the sunlight (not on a cloudy day, on a sunny day) and your indicated camera settings will be correct. Be careful to watch that your shadow does not affect the light meter reading.
You still want it easier? OK, I can do that too, for I know exactly what camera settings your light meter will give you when measuring reflected sunlight from both the Kodak gray card and from the grass. Here it is -- with ISO 100 speed film, a lens opening of f/11 and a shutter speed of 1/125th of a second. That is the ideal exposure setting for your camera REGARDLESS of what your light meter indicates. That is the ideal exposure setting for your camera REGARDLESS of what color clothes your subjects are wearing, whether you’re standing in front of a white beach or a dark forest. Those settings will prove true and ideal whether you’re photographing a dark blue house or a bright yellow house or whether you’re photographing a black car or a white car. By the way, if you photograph a white car with those ideal camera settings, the car will be white in the finished photo. If you photograph a black car with those ideal camera settings, the car will be black in the finished photo.
Some of you frustrated die-hard photographers still don’t believe me. “If photography were that simple,” you’re saying, “why did someone invent the fully automatic camera?” I don’t know, because automatic cameras really don’t work very well. They certainly are not as automatic, nor anywhere near as accurate, as the manual camera settings I just gave you. But let’s go on, for things even get simpler.
The Best Experiment of All!
It’s time to imagine another experiment for all you disbelievers out there, and this one will really throw you. By the way, I’ve won lots of money from my photography students who have often bet me that I am wrong regarding this experiment. My standard bet is $5.00. I have never paid once. I have collected every time. Read carefully.
You are outside in a sunny meadow. You are going to take a photograph of the meadow at ISO 100-speed film, an f-stop of f/11, and a shutter speed of 1/125th of a second – the ideal exposure setting. You take your photograph of the meadow with these camera settings even though your light meter tells you they are incorrect. Don’t forget, the only thing your light meter knows how to do is turn the bright meadow into a medium gray. About 100 feet away from you is a thick forest. On the forest floor are several scattered patches of sunlight shining through openings in the canopy. You walk into the thick forest. Your light meter goes crazy with the near darkness indicating a lens setting of f/4 and a shutter speed of 1/125th of a second. Don’t forget, the only thing your light meter knows how to do is turn the dark forest into a medium gray. What exposure should you use? I suggest our ideal exposure. “How can that be?!!” you might ask. “How can you go from a bright sunlit meadow into a dark forest and keep your camera settings the same?” Are you having fun yet?
Please read this carefully. I told you there were several scattered patches of sunlight on the forest floor shining through openings in the canopy? Well, are these sunlit patches not the same brightness as the meadow? They are much smaller in area than the meadow, but they are of the same brightness from the same sun shining through openings in the canopy onto the forest floor. Was not the bright, sunlit meadow ideally exposed at ISO 100-speed film, a lens opening of f/11, and a shutter speed of 1/125th of a second? If the bright sunlit meadow was perfectly exposed at those camera settings, then it will require the same camera settings to perfectly expose those scattered patches of bright sunlight on the forest floor. If those sunlit patches on the forest floor are also ideally exposed, so will be the rest of the photograph – trees, scrubs, ferns, walking trails, etc. “But wait!” you might be saying out loud attempting to rebut my claim, “If the exposure is ideally set to correctly reproduce those bright patches of sunlight on the forest floor, what will the dark forest turn out like in my photo?” I say to you, “It will turn out looking just like a dark forest – absolutely perfect!”
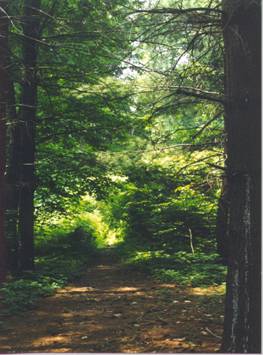
Taken with 100-speed film at 1/125th and f11; need I say more?
Are you shaking your head in disbelief? Well, try this experiment for yourself. If you have a digital camera that shows your photograph instantly, that's fine. If you have a film camera, use color slide film. Your slides will be perfectly exposed, both those taken out in the sunny meadow and those exposed inside the thick forest. If you have a film camera, only use color slide film for this experiment. Why? Because if you use color print film, the fancy, automatic, snap-shot printing machine at the local one-hour photo shop and feed emporium will automatically read the light and dark areas of your film and try to correct your prints based on the density variations in your negatives. Your forest negatives may appear to be under exposed to these machines (they will not be under exposed) and may be incorrectly printed at a shorter exposure. Therefore, your finished forest prints may appear too light. Your bright sunny meadow negatives may appear over exposed by these machines (they will not be over exposed) and may be incorrectly printed at a longer exposure. Therefore, use only color slide film, for it tells the truth, and it cannot be altered in a printing process. Then, after viewing your results, send me $5.00 if you bet against me. I trust you to be fair and honest dealing with this wager; after all, we photographers must trust each other and stick together.
What About Alternative Camera Settings?
Can you use the ideal exposure setting and still go to f/16 for greater depth of field or go to a shutter speed of 1/500th of a second to stop faster action? Of course you can! How about using 400-speed film instead of 100-speed film? Of course you can! Don’t forget the earlier chapters in this book that addressed film speeds, f-stops, and shutter speeds. Remember that each subsequent shutter speed and f-stop either doubles or cuts in half the amount of light. If you can divide or multiply by 2, you can do expert photography.
Let’s look at some examples.
FUN LEARNING EXPERIENCE 1
Let’s say you are photographing children running (or geese flying) and you want to use a shutter speed of 1/250th of a second instead of the ideal exposure shutter speed of 1/125th. Simply turn your camera’s shutter speed to 1/250th. Now you have cut the light in half that will reach your film from the original 1/125th shutter speed, so you must do something to increase the light that will reach your film. You can go from a lens opening of f/11 to f/8, which will double the amount of light reaching our film, or you can go from ISO film speed 100 to ISO film speed 200. In review, as you cut the ideal exposure light reaching your film in half by going from 1/125th to 1/250th, you must double the light some other way so the same amount of light will reach the film as in the original ideal exposure settings. You may double the light received on the film by going from a lens opening of f/11 to f/8. You may double the sensitivity to light reaching the film by going from an ISO 100 film speed to an ISO 200 film speed. Because changing f-stops is much easier than changing films, our f-stops are usually adjusted.
FUN LEARNING EXPERIENCE 2
Let’s say you want to use a lens opening of f/8 instead of f/11 because you desire a narrower depth of field. Simply set your lens from f/11 to f/8, but you have just doubled the amount of light that will reach your film, that is, twice as much light as the perfect exposure requires. What can you do? Simply change your shutter speed from 1/125th to 1/250th of a second. This cuts in half the amount of light that will reach your film again exactly reproducing the needed light for the ideal exposure.
FUN LEARNING EXPERIENCE 3
You want to photograph an eagle sitting on a tree branch in a wire mesh cage
at the zoo. You don’t want the wire mesh to show in the photograph, so you are
going to use the large lens opening of f/4 for a very narrow depth of field.
You set your lens from f/11, the ideal exposure setting, to f/8 to f/5.6 to
f/4. In doing so you have increased the amount of light that will reach your
film by 8 times. You now have 8 times TOO MUCH light. Somehow we must, by
means other than f-stops, reduce the amount of light that reaches our film by a
factor of 8. What can we do? Well, your ideal exposure shutter speed is 1/125th
of a second. By going to 1/250th, we cut the light in half, and by
going to 1/500th, we cut the light in half again resulting in 1/4th
as much light as the original 1/125th of a second. If our camera can
go to a shutter speed of 1/1000th, we have cut the light in half
again resulting in our desired light reduction by a factor of eight. If our
camera does not go to a shutter speed of 1/1000th of a second, we can
use an ISO film speed of 50 instead of 100. This will make our film ½ as
sensitive to the existing light giving us the same light reduction results if we
went to a 1/1000th of a second shutter speed. If you can multiply
and divide by 2, you can become an expert photographer!
Many Different Camera Settings Have the Ideal Exposure Setting!
All of the various camera settings listed below provide the film with identical amounts of light. Different ISO film speeds may be used for better picture sharpness or increased sensitivity to light. Different f-stops may be used to vary one’s desired depth of field. Different shutter speeds may be used to stop faster action. Regardless, each of the camera settings listed below provides the same amount of light reaching the film and in each case the same amount of light as the gray card exposure.
EACH OF THE CAMERA SETTINGS BELOW PROVIDES THE SAME
AMOUNT OF LIGHT
REACHING YOUR FILM OR DIGITAL CAMERA CARD AS DOES THE IDEAL EXPOSURE.
| ISO SPEED | F-STOP | SHUTTER SPEED |
| 100 | f/22 | 1/30 |
| 100 | f/16 | 1/60 |
| 100 | f/11 | 1/125 |
| 100 | f/8 | 1/250 |
| 100 | f/5.6 | 1/500 |
| 100 | f/4 | 1/1000 |
| 200 | f/22 | 1/60 |
| 200 | f/16 | 1/125 |
| 200 | f/11 | 1/250 |
| 200 | f/8 | 1/500 |
| 200 | f/5.6 | 1/1000 |
| 400 | f/22 | 1/125 |
| 400 | f/16 | 1/250 |
| 400 | f/11 | 1/500 |
| 400 | f/8 | 1/1000 |
Now, some of you may think I have implied you should ignore your light meter, in fact, not even use it, and simply set your camera to any of the settings above. You’re correct. I have implied just that. Very good! You’re paying excellent attention! Now, in the next chapter I’m going to ask you not to focus your manual camera either. Things are really getting much simpler. Read on!