THAT AMAZING DEPTH OF FIELD
(A very important chapter!)
Whether or not your camera allows you to open or close the opening in the lens, it will be necessary to discuss DEPTH OF FIELD. Fully understanding DEPTH OF FIELD will greatly improve the quality of all your photographs, not just your bird photos. Different chosen lens openings can create absolute magic with your photographs and give you a control over your pictures far beyond the reach of many fully automatic cameras. Read on and enjoy!
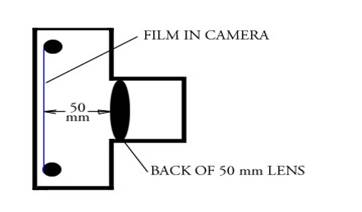
The distance inside your camera from the back of the lens to the film is called the “focal length.” If you have a 50-mm (millimeters) lens, then the distance from the back of your lens to the film is 50 mm. Therefore, a 200-mm telephoto lens has a distance from the back of the lens to the film of 200 mm. A 28-mm wide-angle lens has a distance from the back of the lens to the film of 28 mm. With cameras using 35-mm film, a 50-mm lens is considered normal. Lenses much larger than 50 mm are considered telephoto, and lenses much smaller than 50 mm are considered wide angle. This focal length is a very important and interesting distance because your lens openings, also called “f-stops” or “apertures,” are derived from this distance. Don’t get turned off from all the technical names. A lens opening, a lens aperture, and a lens f-stop all mean the same thing.
On your lens you will notice several numbers known as "f" stops. The “f” in
f-stop stands for focal length. These f-stop numbers are 1.4 - 2 - 2.8 - 4 - 5.6
- 8 - 11 - 16 - 22 and sometimes 32. Every lens does not have all the above
listed f-stops. The letter "f" is not printed on the lens, just the number.
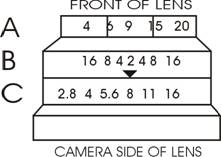
The f-stops on the below lens are located on ring “C.” This lens is set to a
lens opening of f/8.
As you set the f-stop on your lens, you are opening and closing the iris allowing more or less light to pass through to the film.
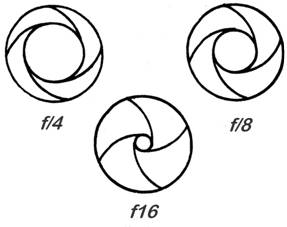
The iris of a lens opened at 3 different f-stops.
Each f-stop, when compared to the f-stop next to it, either doubles or cuts in half the amount of light allowed to reach your film. That is, if you change a lens opening from f/8 to f/11, you’ve cut in half the amount of light allowed to reach your film. A lens opening of f/4 allows twice as much light to reach your film as f/5.6. F/16 allows half as much light to reach your film as f/11, etc.
Going this way ® on the f-stop scale, each subsequent f-stop cuts the amount of light in half (i.e. f/2 to f/2.8)
® cuts in half ®
¬ doubles ¬
F-stop Numbers are not What They Appear to Be.
These f-stop numbers are really fractions, that is, f/2 really means f-1/2 (one half), and f/8 really means f-1/8 (one eighth). With this information, it is easy to see that f/16 is smaller than f/4, for 1/16th is a smaller number than 1/4th. People often mix this up because 16, as printed on the lens, is larger than 4, but knowing that these numbers are actually fractions will help us remember f/4 is actually larger than f/16 (1/4 is larger than 1/16). The number “1” making the f-stop a fraction, the numerator, is not printed on the lens because there isn’t enough room.
The diameter of the lens opening at f/4, is exactly 1/4th the focal length of the lens. In other words, the diameter of the lens opening when a 100-mm lens is set to f/4 is 25 mm (1/4th of 100 mm = 100/4 = 25 mm). The diameter of the lens opening when a 50-mm lens is set to f/8 is 1/8th of 50 mm or 6.25 mm (1/8th of 50 mm = 50/8 = 6.25 mm).
The size of the opening in your lens, the f-stop, will determine not only how much light will pass through the lens to your film, but will also determine what areas of your photograph will be in focus. The depth into your photographs where all objects will appear in focus is called “depth of field.” This depth of field area cannot be controlled by your focus control; it can only be controlled by the size of your lens openings. This single fact makes f-stops extremely significant and gives f-stops far more importance in taking photographs than just managing light control. This is also very important when you are trying to photograph a bird in flight. The smaller the lens opening, the greater depth of field you will have, and the greater the distance the bird can fly through and still be in focus. This is very important! Depth of field is the distance in front of the object you are focusing on and the distance behind that object where other objects will also be in focus. I repeat for emphasis: You cannot control depth of field with your focus adjustment, but only with your lens openings – they are very important!
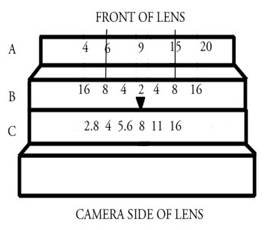
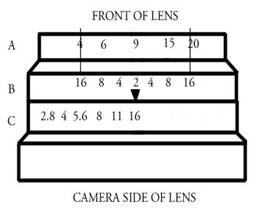
Above is pictured a 50-mm lens for a 35-mm camera. The lens has three different scales, and for the sake of illustration I have labeled them A, B, and C. Scale “A” tells you how far away your camera (in feet) is from the object on which you have focused (I didn’t want to end a sentence with a preposition). The number 9 in scale “A” is above the black triangle telling us the object we have focused on is 9 feet away from the camera. Scale “C” tells you what f-stop you have selected, and in the above illustration an f-stop of f/8 has been chosen. Scale “B” tells you your depth of field – how wonderful! Yes, scale “B” tells you how far in front of the object 9 feet away and how far behind that object where other objects will also appear in focus.
Now, the camera lens has been focused on an object 9 feet away from the camera (scale “A”), and the camera lens has been set to an f-stop of f/8 (scale “C”). Notice that there are two number “8s” on either side of center on scale “B.” I have drawn straight lines projecting forward from each 8 on scale “B” into scale “A”. Read the numbers on scale “A” pointed to by these drawn black lines. The 8 on the left side of scale “B” projects forward to the 6 on scale “A.” The 8 on the right side of the “B” scale projects forward to the 15 on scale “A.” This means that with a lens opening of f/8 when focused on an object 9 feet away from your camera, all objects will also be in focus from 6 feet in front of your camera to 15 feet away from your camera – your depth of field area.
Let’s look at this another way. When your lens is set at f/8 and focused on an object 9 feet from your camera, all objects existing within 3 feet in front of the object (9’ – 6’ = 3’) and existing within 6 feet behind the object (15’ – 9’ = 6’) will also be in focus.
EXAMPLE:
![]()
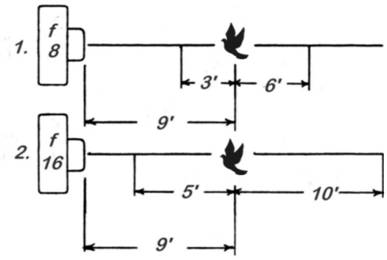
Camera 1 is set at f/8 and it is focused on an imaginary bird 9 feet away from the camera. With an f-stop of f/8, any object 3 feet in front of that bird’s location and 6 feet behind that bird’s location will also be in focus. On camera 2 set at f/16, we get a much larger depth of field, for everything now within 5 feet in front of that bird’s location and 10 feet behind it will also appear in focus. Refer to the lens diagram below.
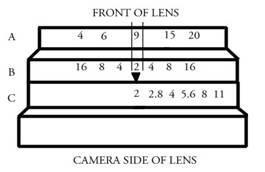
To make things easier, the larger your lens opening, the smaller your depth of field; the smaller your lens opening, the larger your depth of field. Below is illustrated a lens set at f/2, the largest lens opening. Notice the depth of field is very small, only about 1 foot.
To take a bird’s photograph as it flies through a depth of field area of 1 foot is almost impossible; therefore, large lens openings won’t be used. To take a bird’s photograph as it flies through a depth of field area of 15 feet is very possible; therefore, small lens openings will be used for the techniques taught in this book. Don’t misunderstand and think that large lens openings are not desirable, for each lens opening has a different function. For example, if you were to photograph an eagle at the zoo in a wire mesh cage while using a lens opening of f/2, the depth of field would be so narrow that the wire mesh wouldn’t even show up in the photograph. The resulting photo would appear as if the eagle were in the wild. By using f/16, the depth of field would be large enough to bring the wire mesh cage into focus, something you may not find desirable.
An Interesting Fact About Depth Of Field
Have you noticed that the depth of field behind our object of focus is twice as large as the depth in front of our object of focus? When our lens was set at f/8 and focused at an object 9 feet away from our camera, our depth of field was 3 feet in front of the 9-foot object and 6 feet behind it. The distance behind, 6 feet, is twice the distance in front, 3 feet. Similarly, when we set the lens to f/16, our depth of field changed to 5 feet in front of the object and to 10 feet behind it.
It will be important for you to know that in your successful bird photographs, usually the farthest your camera will be away from the bird is about 9 feet. Most successful bird photographs will be taken with your camera around 4 to 7 feet away from the bird. Hummingbirds will often be photographed as close as 2 feet away from your camera. “Will hummingbirds get that close to your camera?” you might say. “Yes,” I reply, “They are such fast and confident aerobatic artists that they have been known to feed from one’s hand.”
I’ve had experiences with some chickadees and wrens that stuffed themselves at my bird feeder after I took their photograph. They became used to the camera’s flash after repeated encounters with it, and it no longer frightened them. On a few occasions, they entered my home from the open window after feeding. They jumped up on my camera, looked around the room, looked at me in my easy chair with my tonic and lime, turned, chirped, and flew back out the window. It almost seemed to me they were checking out my operation and giving it their approval. Read on; you’re going to have lots of fun!
I'm sure you realize that trying to focus on a flying bird, especially one flying toward you, is next to impossible. Instead you will focus on an area about 2 feet past your window which will usually be about 5 feet in front of your camera (see the below illustration). In order to do this, stick something out the window that will be about 2 feet past your feeder. I used a broom. I then focused my camera on the end of the broom. Then by setting the camera lens to f/16, I assured myself that any bird flying 4 feet outside the broom focusing point through 2 feet inside that point would also be in focus. Now remember, the bird is sitting in a tree or clothesline in your view. As the bird flies from the tree to the bird feeder it will pass through this depth of field area and be in focus. This is when you snap the photograph.
EXAMPLE:
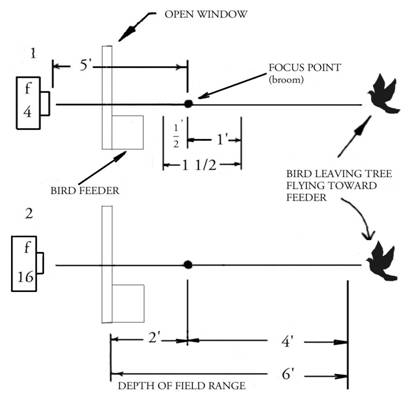
As you can see, with camera number 1 set at f/4, you will only have a depth of field of 1 1/2 feet in which you will be able to snap your camera and still have the approaching bird be in focus. Camera number 2 set at f/16, however, allows you a depth of field of 6 feet. As the bird leaves the tree and flies toward your feeder, it will be in focus for 6 feet of its flight. You may take the photograph anytime the bird is flying within this 6-foot area and be assured that it will be in focus.
To take a photograph of a flying bird within a 6-foot distance is not very difficult, although it will take some practice. To take a photograph of a bird within 1 1/2 foot distance, while flying toward you, is almost impossible, thus the advantage of f/16 over f/4. The smaller the lens opening the greater the depth of field and the greater flying distance a bird will still appear in focus.
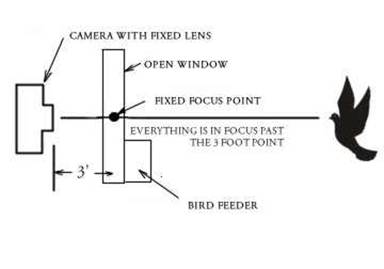
If your camera has a fixed lens, one without adjustable f-stops, your situation is quite simple. Check the camera instructions. You will find the lens is preset so that everything past 3 feet or 4 feet (depending on your camera) will be in focus. Nothing closer than 3 feet will be in focus. This set distance will vary with camera type. Let's say your camera will have everything in focus past 3 feet. All you have to do is place your camera in front of the window with the 3-foot distance point coming into play just in front (toward you) of the bird feeder. This means that any bird will be in focus as it approaches the bird feeder up to 3 feet in front of the camera.
EXAMPLE:
![]()
![]()
Desired Window Set Up
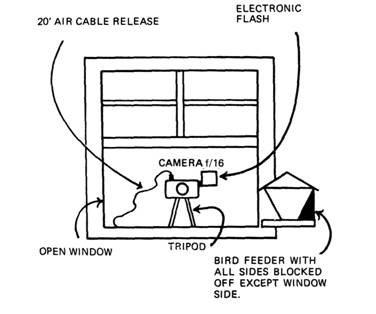
Thus far, we have your camera resting on a tripod in front of an open window. I suggest you place some small houseplants in front of the tripod covering the legs. The birds seem to be frightened of these legs. Perhaps they think it's a small animal. The houseplants seem to immediately take away their fears. It’s amazing! Make sure the plants don't block your camera lens or the electronic flash!
The bird feeder should be fastened outside the window on either the right or left side, not the middle. Your electronic flash should have fresh batteries. Don’t forget to turn the flash on. If you have an automatic electronic flash it should be on the manual setting for this lesson. You are sitting back in an easy chair with a 10-foot cable release bulb in your hand while sipping lemonade and watching the birds in a tree outside your open window. All the sides of your bird feeder, except the window side, have been blocked off so the birds may only land on the camera side. What a relaxing way to spend a few hours. Before we take photographs, however, there are other things to know.