![]()
![]()
![]()
![]()
![]()
![]()
![]()
![]()
![]()
![]()
![]()
PHOTOGRAPHING HUMMINGBIRDS
Let’s just keep right on going from our last chapter about automatic electronic flash. What kind of action could you stop with a shutter speed of 1/50,000 of a second? Why, almost anything! You can’t photographically freeze a bullet popping a balloon because they require a flash duration of 1/1,000,000th of a second. You can freeze a hummingbird's wings, for example, razor sharp, and even see the divisions in the individual feathers! Butterflies, flying insects, water drops, for example - the list is nearly endless!
How Does This Principle Work?
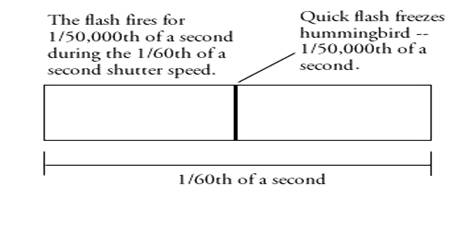
If you were in a dark room and you took a photograph, without a flash, at 1/60th of second, nothing would come out. After all, the room was dark! Now, take the photograph again, in a dark room at 1/60th of a second with a flash that fired at 1/50,000 second. ONLY DURING THAT 1/50,000th OF A SECOND WOULD THERE BE ENOUGH LIGHT TO RECORD A PHOTOGRAPH, AND YOU COULD FREEZE FANTASTIC ACTION.
Set your camera next to a hummingbird feeder on a cloudy day or in the low-light evening hours with a lens setting of f/16, at a shutter speed of 1/60th of a second, with a slow film speed (ISO 64). Under such conditions, there should not be enough ambient light to expose a photograph. This is the result of f/16, being a very small lens opening,
not allowing much light to reach your film in combination with ISO 64 speed film, being very slow in recording any light that was present. If you took a photograph under these conditions, especially in a shaded area, your photograph would be extremely dark at best. REMEMBER? THIS IS JUST WHAT WE WANT!
Now, place your automatic flash about 12 inches away from where the hummingbird will be when it arrives. Set the flash on automatic, not manual. Set it on the color or line bar for the farthest distance range, which in our example is the asterisk bar (see Chapter Five). I know the hummingbird will only be a few inches away from the flash, but we still want to set the flash for the farthest distance scale, around 30 or 50 feet. By doing this, the flash is programmed to try and receive all the reflected light it can from an anticipated far away subject. We are fooling the flash, so to speak. The enormous amount of reflected light it will receive from a hummingbird only 12 inches away will startle its sensor into quickly stopping the flash. Its duration will be extremely short, yet enough light will be supplied to successfully expose the bird. The directions for your flash won’t tell you this trick.
Set the camera on a tripod and focus it on the area just in front of the hummingbird feeder. Place the lens on f/16 regardless of what the flash’s line bar scale indicates. Hook up your cable release, get your lemonade and sandwich ready, and wait. Here is what will happen.
The hummingbird arrives. You push the cable release. The shutter opens for 1/60th of a second, but nothing is registered on the film with a lens opening of f/16 and a film speed as slow as ISO 64 on a cloudy day. Sometime during the 1/60th of a second time period that the shutter is open, the flash will fire.
The light strikes the hummingbird only 12 inches away and a great deal of this light reflects back into the flash’s sensing computer. The computer measures this great intensity of light and shuts the flash off immediately, or in
about 1/50,000th second. Only during this 1/50,000th of a second was there enough light to capture an image. The 1/60th of a second time period expires and the shutter closes. The sequence of events has ended.
Hummingbirds are very easy to photograph; they hold still for you! As a hummingbird is drinking from a hummingbird feeder, it pauses and backs away from the feeder as if to catch its breath between drinking sessions. Then in a second or two, it moves up to the feeder, drinks some more sugar water, then moves back again and rests. Have your camera set to take your photograph at this “backed away” position; the feeder will not be in the photograph.
Develop your photograph. Chances are, you won't believe your eyes! If your photograph is too dark, use a faster film the next time or take the photograph during a brighter time of day. You might try to increase your f-stop from f/16 to f/11 to f/8 in order to increase the recorded light, but don’t go much larger than f/8. Remember that f/16 is needed for the depth of field so our bird remains in focus. The larger lens opening of f/11 also has good depth of field, but not as good as f/16. With hummingbirds we
can get away with f/11 or maybe even f/8 because the hummingbird is stationary in the air while at the feeder -- like a helicopter. The hummingbird is not quickly flying through a depth of field range like a bird approaching a bird feeder where a f-stop of f/16 or smaller is mandatory.
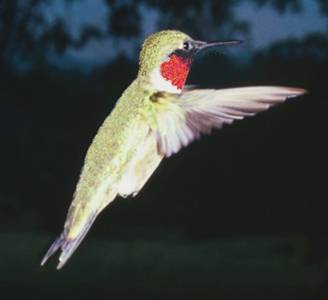
This male ruby-throated hummingbird was photographed as described above. The electronic flash about 12 inches away from where the humming bird would be when he backs away from the hummingbird feeder tube. Notice the dark background produced by reducing the exposure to the ambient light.
Now try this automatic flash technique on the sparrows and cardinals at your regular bird feeder. You will be amazed at the action you will be able to stop and the increased clarity of your photographs.
An automatic electronic flash ranges in price from $40.00 on up and is well worth the investment. An automatic electronic flash costing around $100.00 should have the power, range scales, and short flash duration to allow you to successfully do anything described in this book.
Technique in Taking Hummingbird Photographs
Hummingbirds, in my opinion, make the most beautiful subjects for any bird photograph. They are, surprisingly, very easy to photograph, but they are seasonal in some parts of United States.
A special hummingbird feeder must be purchased at the cost of around $6.00. This feeder consists of a clear glass bottle with a tube on the end from which the hummingbird drinks sugar water. You can make a super saturated sugar solution (Hey! That’s kind of fun to say!) by dissolving 1 part of sugar in 4 parts of water; that is, if you use 1/2 cup of sugar then dissolve in this sugar in 1-cup of water. You don’t need to heat the water on the stove; the sugar will dissolve at normal room temperature. I know one person who heated the water to near boiling in an effort to dissolve the sugar quicker and then poured this steaming solution into the hummingbird feeder. WOW! That would definitely injure a hummingbird! Please only use room temperature water. Sometimes a very slight amount (one or two drops) of red food coloring is added to create a bright red color to the solution, for it is this color that helps attract the hummingbird. Often hummingbird feeders come with red colored attachments and plastic red flowers around the feeding tube.
Just like bird feeders filled with seeds, we only want one side available for the birds to feed. Hummingbird feeders are no exception. You can’t photograph a hummingbird if it is drinking from one feeding tube and your camera is set up at a different feeding tube. Therefore, buy the kind of hummingbird feeder that only has one feeding location. Should you purchase a hummingbird feeder with more than one feeding tube, cover all of them except the one next to your camera.
Once you have your hummingbird feeder, place it outside on a wooden post or hang it from tree limb or any yard object that you find suitable. It should be at camera height, depending on your tripod size, and in clear view of passing birds. Hummingbirds should arrive as soon as one -hour or as long as one week depending on your location. The season for hummingbirds and the type of hummingbirds you can attract vary with different parts of the United States. If you live east of the Mississippi, you only have one choice, the ruby-throated hummingbird. It is a beautiful bird. All other species of hummingbirds in the United States live west of the Mississippi.
Remember, to a hummingbird, cameras on tripods look like something with legs, like animals, like predators. I suggest after you notice hummingbirds visiting your feeder, that you place your camera on the tripod and place it about 15 feet away from the feeder. It would be a good idea if you placed some vines around the tripod’s legs or some taller houseplants in front of them. This is the start of a “confidence building” exercise for the hummingbirds. Leave your tripod in this position for several hours or until you again see hummingbirds frequenting your feeder. Hummingbirds will test this three-legged beast you have placed near their domain. First, they will stop visiting the feeder. Then they will fly by the feeder as if to see if the tripod moves. Their next “stake out” activity will be to land on a near-by tree branch for a few seconds, then fly away. Again, the tripod and camera did not try to eat them. Soon the hummingbirds will come to the feeder for a drink, but only a short sip, no long lingering swallows. After an initial sip, they will quickly fly away. During all these gradual investigations, the tripod and camera never move. Before long, the hummingbirds will no longer consider the tripod a threat and will be back at your feeder with regularity. When this occurs, move the camera and tripod 5 feet away from the feeder. The entire process may repeat
itself. It may not. When the hummingbirds seem comfortable with the 5-foot distance, move the camera and tripod within 2-3 feet from the feeder. That’s focusing distance! Do not put film in your camera during this “confidence building” exercise, for the hot sun may ruin the film as your camera and tripod sit outside for several hours.
Place your camera so you focus on the end of the hummingbird feeding tube, then turn the camera so your view finder is in position to photograph an area just in front of the feeding tube. Again, we do not want the feeder in the photograph -- just a hummingbird in flight.
When a hummingbird appears, the following will occur. First the hummingbird will fly to the feeding tube and hover just before it. At this point the hummingbird is in the view of your camera, just in front of the feeder without the feeder. DO NOT TAKE THE PHOTOGRAPH. LET THE HUMMINGBIRD DRINK SOME SUGAR SOLUTION FIRST. If you frighten the hummingbird away with the flash before it gets a chance to drink, it might not return.
As previously mentioned in this chapter, after drinking, the hummingbird will then back away from the feeding tube again into your viewfinder as it hovers in front of the feeder. Shortly it will return to the feeding tube, drink a few swallows, and back off again in your camera's view. It is at one of these points, as the hummingbird backs away from the feeding tube and into your camera’s view, that you should take the photograph.
The hummingbirds around my house have become extremely comfortable and trusting of both me and my camera and tripod. One day I snapped a photograph of a hummingbird and then felt the need to check my camera’s viewfinder. I suspected that possibly the feeder was partially in the photograph. I approached my camera and looked through the viewfinder. Everything was fine. Suddenly, a male ruby-throated hummingbird appeared. It drank for several seconds with my camera (and me) only 2
feet away from it. As I looked through my viewfinder, I noticed a small, brown ant was on the feeder also enjoying some of the sugar solution. This ant then left the feeder and crawled up the hummingbird’s beak while the bird was drinking! I had not advanced the film in my camera, so I could not photographically preserve this incredible moment. My point? Hummingbirds will get used to you and your tripod. Be patient! Also, anything can happen when photographing nature’s creatures – be ready!

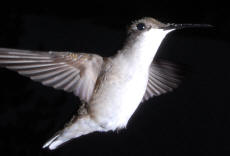
This female ruby-throated hummingbird was photographed as it backed away from the feeder during one of its feeding breaks. The hummingbird feeder is out of sight to the right of the photograph. When the hummingbird was feeding, only a portion of it was in the camera’s viewfinder. When it backed away from the feeder to rest, all of the bird fell into the camera’s view.
The flash does not always frighten a hummingbird away as it does a cardinal or sparrow. Hummingbirds are very quick, and they know it. They depend in this quickness for defense, and it works very well for them. On several occasions, wild hummingbirds have been recorded in a large city feeding from a person's hand. They know they
can get away should anything happen.
Photographing hummingbirds is when a 20-foot, cable, shutter release comes in handy. If your 10-foot, cable release came with two10-foot detachable sections of tubing, now is the time to connect them together. Try to set your feeder so the cable release will reach to a place of relaxation for you, like a chaise lounge or deck chair. You want to be comfortable; you may be there a while. I take my hummingbird photographs sitting on the back porch with the shutter release tube going out the door to the camera on the lawn.
One very nice thing about hummingbirds is that they are predictable. They must feed every fifteen minutes in order to maintain the tremendous amount of energy required for them to fly. At first you will probably think they are a large bee, but look closer and see a tiny little bird beating its wings so fast it creates a humming sound as it flies. I timed a hummingbird once and found that it returned to the feeder every 12 to 17 minutes. Knowing when the hummingbird will return makes taking the photograph much more exciting feeling the anticipation. Also, this knowledge gives you some time to readjust your camera should it become necessary.
You will want your camera as close as possible because the hummingbird is so small. You will want your automatic electronic flash set on the farthest distance scale and as close as possible to where the hummingbird will be feeding. Being this close the hummingbird will catch almost all the light from the flash, thus reflecting the light back into the flash’s light sensor causing a short flash duration. I also suggest a lens opening of f/11 and slow speed film to start with (ISO 64 or 100). You can make adjustments to your f-stops and film speed after developing a few photographs and learning what camera setting changes are needed.
You will find that a male and female ruby throat will visit the feeding tube at intervals. If two males or two
females appear, great fights will occur as one hummingbird chases off the other. To capture one of these encounters on film would indeed be a challenge. Lack of patience is the main handicap. If you don't have it, the quality of your photographs will reflect this.
Hummingbirds and Flowers
There are many flowers that hummingbirds are attracted to, and being successful at photographing hummingbirds drinking nectar from flowers is a very rewarding experience. Which flower is the hummingbird going to drink from so I can set up my camera by that flower? That’s a very good question, but there is no easy answer. If your camera is close to one flower in a group, you can bet the hummingbird will feel less intimidated by going to a flower farther away from the camera. It such a case, set your camera at a distance where you are seeing several flowers through the viewfinder. This will also increase your depth of field, for the farther away your camera is from the subject, the greater your depth of field. Make sure your flash’s automatic sensor control is set for the farthest distance. If your flash is detachable (preferred), move it closer to the flowers, but make sure you can’t see the flash in the viewfinder.
Here a telephoto lens would be in order. This will allow you to move your camera several feet away from the flowers, but still focus on one flower at a time. You would simply wait until a visiting hummingbird drinks the nectar from the flower you have chosen for your camera. Your flash must be close to the flower, however, in order to get a short duration from the reflected light. A flash that detaches from your camera in this scenario is necessary.
The closer an automatic electronic flash is to the subject, the more reflected light hits the sensor and the shorter the flash’s duration, thus, the faster action it can freeze. But an automatic electronic flash can reach its shortest duration several feet away from the subject. On page 43, I estimated my automatic flash reaches its shortest duration of 1/50,000th of a second at 2.8 feet. What would happen if I would move my flash to 2 feet away from the subject? It would remain at a duration of 1/50,000th of a second, but provide twice as much light. What if I moved my flash to 1.4 feet away from the bird? It would remain at a duration of 1/50,000th of a second, but again provide twice as much light as from 2 feet, or four times as much light as from 2.8 feet. Here we are doubling and quadrupling the light that reaches our film, not through larger f-stops as is customary, but from moving the flash, not the camera, closer to the subject. A flash detachable from your camera offers great advantage! Go back now and read the italicized print on page 35 again.
Note: Many modern automatic electronic flash units do not have a flash duration as short as 1/50,000th of a second. Some offer a duration up to 1/20,000th or 1/30,000th of a second. Many models also don’t offer a duration as slow as a 1/500th, but rather 1/700th or 1/1000th of a second instead. All these units will work perfectly for all the photographic techniques described in this book. Although I frequently refer to my flash’s short 1/50,000th of a second, I do so for illustration purposes. Any flash with a duration as short as 1/5000th of a second is more than fast enough to freeze the wings of any bird. Check your flash’s specification sheet if you need to know this information.