![]()
![]()
![]()
![]()
![]()
![]()
![]()
![]()
![]()
![]()
![]()
Chapter Five
(You can photograph things you’ve never dreamed of being able to photograph!)
There are two types of
electronic flash: automatic and manual. The automatic type has a switch
allowing either automatic or manual operation. Let's examine how these work.
On any electronic flash you will find a scale similar to this illustration.
 |
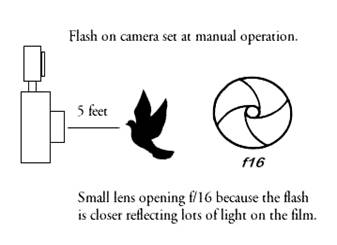
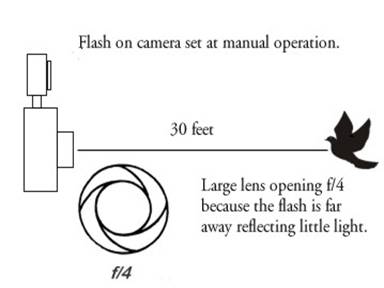
This is a scale for an electronic flash’s manual operation. First you set the film speed on the ISO scale. I chose ISO 50 for this illustration as indicated by the black arrow ^ underneath the “50” on the top ISO scale. The F-stop scale indicates a lens opening of f/5.6 for photographing objects 22 feet away from our flash is desired. By studying the above scale, you can see if your flash were moved 32 feet away from the object you want to photograph, you would have to change your lens opening to an f-stop of f/4. Please find the 4 on the F-stop scale above the 32 on the Distance Feet scale to substantiate this. Similarly, if your flash were only 8 feet away from your object, your lens would require an adjustment to f/16 as the scale indicates. These settings are only correct with an ISO 50 film. If we were to change the film speed, then the other scales would change as well. Study this scale so you understand it. Then study the scale on your electronic flash until you’re familiar with its operation.
Every time you change the distance that your manual electronic flash is away from your subject, you must also make an f-stop adjustment on your lens. These f-stop adjustments are necessary because the closer the flash is to your subject, the more light will be reflected from your subject to your film. In such a case, in order to keep your subject from receiving too much reflected light from your flash (over exposed), you must set the lens to a smaller f-stop like f/16.
The farther away your manual electronic flash is from your subject, the less light will be reflected from your subject to your film. In such a case, in order to allow your film to receive enough reflected light from your subject, you must set the lens to a larger f-stop like f/4.
Let’s do a mental experiment to substantiate how a manual electronic flash affects the light reaching your film. Imagine you have a friend turn on a flashlight and aim it at your eyes from a distance of 16 feet away. Now have your friend walk toward you keeping the flashlight aimed at your eyes. You will receive more and more light until it almost hurts your eyes at a very close distance. Now have your friend back up to 32 feet away from you still shining the flashlight in your eyes. The farther away from you the flashlight becomes, the less light will be shining in your eyes. The same is true with electronic flash. The closer your flash gets to the subject being photographed, the more light will be reflected into the camera and onto the film. The farther away your flash gets from the subject being photographed, the less light will be reflected into the camera and onto the film.
In review, with a manual electronic flash near your subject, you must close the lens opening to prevent too much light from reflecting onto your film. With a manual electronic flash far away from your subject, you must
increase the lens opening to insure enough reflected light reaches your film. The manual flash scale tells you which lens opening adjustments are necessary for which flash-to-subject distance.
Being required to constantly change your f-stop setting each time you change the subject-to-flash distance is somewhat of a bother, to say the least!
An automatic electronic flash has a computer that eliminates the need to change f-stops as you vary your distance from the subject. Here is how automatic electronic flash works.

… xxx ***
![]()
Electronic flash distance/range selector switch
Notice the scale of the automatic flash is similar to that of the manual flash with the addition of the bar range scales as illustrated above. On many automatic electronic flashes the bar scales are color-coded. With other models, they are indicated with symbols. The automatic electronic flash
illustrated above has three range scales as indicated by the asterisk line (***), the (xxx) line, and the dotted line (…). Notice the selector knob allows a means of selecting which bar range you want. Your automatic electronic flash also has a means of selecting different ranges. You should become familiar with its scale and controls.
The asterisk bar has been chosen for this example and the selector switch is positioned for it as illustrated. What this tells us is we must set the camera at f/5.6 for objects 22 feet away or closer (the range of the asterisk bar) when using an ISO film speed of 50. NOTICE I SAID, "OR CLOSER." We can be 22 feet away from our subject with the camera set at f/5.6 and walk all the way up to the subject without changing the f-stop on the lens. We can take photographs any distance on a range from 22 feet away or closer and they will all be properly exposed without changing the lens f-stop setting!
Now let’s look at the (xxx) bar scale. If the automatic electronic flash were set to the (xxx) range, our lens would need to be at f/8 with ISO 50-speed film and all photographs would then be properly exposed with a flash-to-subject range of 16 feet or closer. If we wanted to use a lens opening of f/11, the (…) flash-to-subject-range would be chosen with the selector switch and all subjects would be properly exposed if they were 11 feet or closer from the flash. This is a tremendous advantage, for f-stop changes are not necessary as the flash is moved closer or farther away from the subject. Let's see how the automatic electronic flash accomplishes this task.
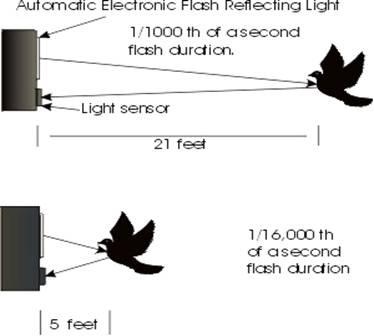
At a 21 foot distance between the subject and flash, the automatic electronic flash fires and reflects its light from the subject back into the light sensing unit of the flash’s computer where the intensity of the reflected light is measured. The sensor receives and measures both the ambient sunlight and the light from the electronic flash. The computer allows the flash to remain on until enough light is reflected from the subject onto the film to take a properly exposed photograph, after which, the sensor shuts off the flash. At a distance of 21 feet, the flash used in this example would stay on for a duration of 1/1000th of a second.
If our subject-to-flash distance were changed so the subject was only 5 feet away from the flash, much more light would be reflected into the light-sensing unit of the computer. Here the sensing unit would measure this extra light and shut the flash off sooner so just the right amount of reflected light is received for a properly exposed photograph. The flash duration at 5 feet would probably be around 1/16,000th of a second. The flash duration at 4 feet
would probably be around 1/32,000th of a second! The closer we get to the subject the more light is reflected back into the light sensor computer and the time the sensor allows the flash to remain on becomes shorter. We can actually control the time the flash is left on from 1/500th of a second through 1/50,000th of a second depending on the power and type of your automatic electronic flash and on how much light is reflected from your subject into the sensor.
| Flash-to-Subject Distance | Flash Duration |
| 45 feet | 1/500th |
| 32 feet | 1/500th |
| 22 feet | 1/1,000th |
| 16 feet | 1/2,000th |
| 11 feet | 1/4,000th |
| 8 feet | 1/8,000th |
| 5.6 feet | 1/16,000th |
| 4 feet | 1/32,000th |
| 2.8 feet | 1/50,000th |
| 2 feet | 1/50,000th |
The above chart is for my automatic, electronic flash costing around $100.00. The slowest this flash will fire is about 1/500th of a second. Notice at the 32-feet subject-to-flash distance, the flash duration has slowed to its minimum speed (1/500th of a second). Also notice as the flash-to-subject distance is increased to 45 feet, the flash duration does not go slower than 1/500th of a second.
The fastest this flash will fire is about 1/50,000th of a second. Notice the flash duration gets shorter as the flash-to-subject distance decreases until at 2.8 feet away the shortest flash duration possible (1/50,000th of a second) is
reached. Because this is the fastest the flash will fire, the duration is not shorter when the flash is moved closer to the subject at 2 feet away.
These flash durations are based on the majority of the light being reflected back to the automatic sensor on the flash. If you’re photographing a person 5 feet away from your flash, far more light will be reflected to the automatic sensor than would be when photographing a sparrow 5 feet away from the flash. The person will reflect much more light back to the flash simply because a person is much larger than a sparrow. The more reflected light hitting the flash’s automatic sensor, the shorter the flash’s duration. So how do we get lots of light reflected from a small sparrow? Move the flash closer to the bird! Why not move the flash less than 1 foot away from where the bird will land on the bird feeder? At such a close proximity, lots of light will be reflected from the bird back into the flash’s automatic sensor. Here’s a true advantage of using a detachable electronic flash! If your flash is not detachable from your camera, then move your camera as close to the area where the bird will land on your bird feeder that will still allow clear focus and good depth of field. Because each camera is different, you’ll have to either read your camera’s operating instructions or experiment with a few trial photographs. Believe me, the extra time and effort required to do this will pay off later on with spectacular, bird photographs!
Also notice on the Flash-to-Subject Distance chart that the flash-to-subject increments expressed in feet are the same distances as represented by the standard f-stops (16, 11, 8, 5.6 feet). If you adjust your lens from f/16 to f/11, you double the amount of light reaching your film. Therefore, if you move your flash-to-subject distance from 16 feet to 11 feet, you also double the amount of light reaching your subject. To correct this doubling of light (over exposure), your automatic electronic flash cuts its duration in half from 1/2000th of a second to 1/4000th of a second.
By knowing the fastest and shortest flash duration on your particular brand of electronic flash, you can actually pick the flash duration you want to use. With hummingbirds you need a short flash duration to freeze their wings (1/5000th +). A short flash duration freezes action, but provides little light. Hummingbirds need less depth of field because they are stationary when photographed; therefore, larger lens openings (f/8) can be used to compensate for the small amount of light provided with a short flash duration. With birds the size of sparrows or cardinals, a longer flash duration can be chosen (1/2000th) because these birds’ wings flap much slower than a hummingbird’s wings. A longer flash duration provides more light, so smaller f-stops can be used with sparrows (f/16) to create the needed depth of field for the flight path into the bird feeder.
I photographed this sparrow as it approached my bird feeder about 8 feet away from my camera. It was just entering the depth of field area. The light from the automatic electronic flash had to reflect from the bird 8 feet away back into the flash’s sensor. Notice the falling snow..
Fully Automatic Cameras
Some newer cameras with a built in flash measure the reflected flight from the flash internally through the camera lens instead of externally through a separate sensor on the flash. These internal camera sensors should be just as accurate and capable of controlling the duration of the flash exposure as the external sensors are. If such a camera is fully automatic, it will select a shutter speed of between 1/60th and 1/125th of a second because its focal plane shutter requires this with electronic flash just as does the recommended manually operated camera. Because such a slow shutter speed will provide too much reflected light for our film, an automatic camera will, in this case, select a small lens opening like f/16 for exposure control. My, my, how nice. A fully automatic camera automatically selects both the shutter speed and f-stop we desire when placed in such an unusual situation as being a few inches away from a hummingbird. Things are working out nicely.